You manage dozens of client WordPress sites. You rely on visual regression testing to catch update breakage before your clients do. But instead of clean comparison screenshots, you keep getting blank images, Cloudflare challenge pages, or cryptic 403 error screens.
Sound familiar?
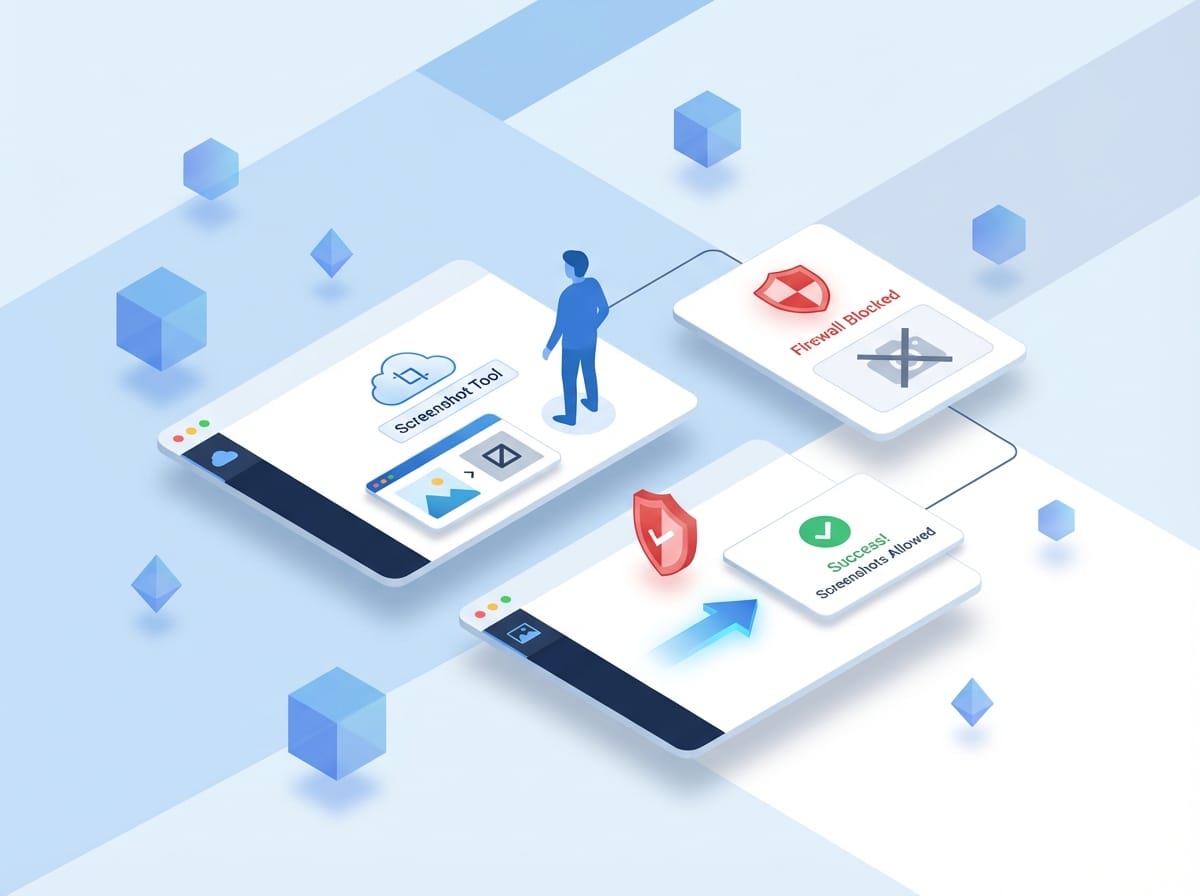
If so, the root cause is almost always the same: the site’s security layers are doing exactly what they were designed to do. They are blocking automated requests. Your visual testing tool sends headless browser requests that look, to a firewall, indistinguishable from a bot attack. The security system does not know whether the request comes from a malicious scraper or from your monitoring service. It blocks both.
This is not a bug. It is security working as intended.
The challenge, then, is not to bypass security. It is to allow your monitoring tool through while keeping actual threats out. This guide walks you through every layer of security that can block your screenshots, explains how to diagnose which layer is causing the problem, and shows you exactly which WebChangeDetector settings to use for each scenario.
By the end of this post, you will have a systematic approach to troubleshoot and resolve screenshot failures across all your client sites, no matter what security stack they run.
Table of Contents
- 1 Understanding Why Websites Block Screenshots
- 2 WCD’s Built-in Protection: What Happens Automatically
- 3 Static IP Proxy: The Primary Solution for Firewall Issues
- 4 Screenshot Delay: Solving Rate Limit Problems
- 5 Troubleshooting Decision Tree
- 6 Quick Reference Table
- 7 Best Practices for Agencies Managing Multiple Client Sites
- 8 Conclusion
Understanding Why Websites Block Screenshots
Before configuring any settings, it helps to understand what you are up against. Modern WordPress sites typically have multiple layers of security, and each one can independently block your screenshot requests.
The Three-Layer Security Stack
Think of website security as three concentric walls. A request must pass through all three to reach the actual page content.
Layer 1: DNS-Level WAF (Cloudflare, Sucuri DNS Firewall, Astra)
   ↓ Sits in front of the server. Filters ALL traffic before it reaches the origin.

Layer 2: Server/Hosting Firewall (ModSecurity, CSF, hosting-level rules)
   ↓ Runs on the web server. Blocks based on request patterns, IPs, rate limits.

Layer 3: WordPress Security Plugin (Wordfence, iThemes Security, All In One WP Security)
   ↓ Runs inside WordPress. Blocks based on bot detection, login patterns, country rules.
The critical insight: Each layer operates independently. Whitelisting an IP at the DNS level (Cloudflare) does not automatically whitelist it at the application level (Wordfence). When troubleshooting blocked screenshots, you may need to configure whitelists at multiple layers.
How Automated Requests Get Detected
Security tools use several detection methods. Understanding these helps you choose the right WCD settings.
IP Reputation
Cloud function IPs from providers like Google Cloud, AWS, and Azure are shared infrastructure. Thousands of services, including bots and scrapers, use the same IP ranges. Many WAFs maintain reputation databases that flag cloud provider IPs as “likely automated,” even if the specific IP has never been used maliciously.
User Agent Analysis
Some WAFs inspect the User-Agent header for telltale signs of headless browsers. Strings like “HeadlessChrome” or “PhantomJS” trigger instant blocks. Even an empty or malformed User-Agent header can result in the request being rejected.
Request Patterns and Rate Limiting
When your monitoring tool takes screenshots of 50 pages on the same site, that means 50 requests in relatively quick succession. Rate limiters see this as suspicious traffic. Most security plugins allow configuring thresholds like “block any IP that requests more than 20 pages per minute.” Your screenshot batch can easily exceed these limits.
JavaScript Challenges
Cloudflare’s “Under Attack Mode” and CAPTCHA/Turnstile challenges present interactive pages that a headless browser cannot solve. Instead of the actual page content, your screenshot captures the challenge page itself: the familiar “Checking your browser…” or “Just a moment…” interstitial.
Geographic Restrictions
Some sites block traffic from certain countries or only allow access from specific regions. If your screenshot service runs from a datacenter in a different country than the site’s target audience, geo-blocking rules can reject the request.
Advanced Bot Fingerprinting
Sophisticated WAFs go beyond headers. They inject JavaScript that checks browser properties: canvas rendering, WebGL capabilities, installed fonts, screen resolution, and the navigator.webdriver flag. Headless browsers produce different results than real browsers on many of these checks.
What Blocked Screenshots Look Like
Recognizing the symptom helps you diagnose the cause:
| What You See | Likely Cause |
|---|---|
| Completely blank/white screenshot | Connection refused or reset. The server blocked the request before sending any content. |
| Cloudflare challenge page (“Checking your browser…” or “Just a moment…”) | Cloudflare Bot Fight Mode or Under Attack Mode is active. |
| 403 Forbidden error page | WAF or server firewall blocked the request based on IP or request pattern. |
| Wordfence block page (“Your access to this site has been limited”) | Wordfence rate limiting or bot detection triggered. |
| Sucuri block page (“Access Denied”) | Sucuri Firewall blocked the request. |
| Page loads but images are missing or content is incomplete | Asset rate limiting: the HTML loaded, but CSS/JS/image requests were throttled. |
| Some screenshots work, some fail (same site) | Rate limiting: the first few requests pass, then the limit triggers. |
WCD’s Built-in Protection: What Happens Automatically
Before diving into configurable settings, it is worth understanding what WebChangeDetector does automatically to avoid detection. These features are always active and require no configuration.
Browser Stealth Technology
WCD stealth mode, which makes the headless Chrome browser appear as a regular browser session. It hides the navigator.webdriver property (the most common detection vector), adds realistic browser fingerprints, and prevents standard headless browser detection techniques from working.
Real Chrome User Agent
Instead of a generic bot identifier, WCD sends a current, genuine Chrome user agent string: Mozilla/5.0 (Macintosh; Intel Mac OS X 10_15_7) AppleWebKit/537.36 .... We are a good bot, so we add “WebchangeDetector/1.0” to the user agent. This matches what a real visitor’s browser would send.
Ad and Tracker Blocking
WCD blocks known advertising and tracking scripts using industry-standard filter lists. This serves two purposes: it produces cleaner screenshots (no ad overlays), and it significantly reduces the number of third-party network requests. Fewer requests means less chance of triggering rate limits on third-party domains that could slow down or block page loading.
Cookie Consent Auto-Handling
Cookie consent popups are automatically detected and accepted so they do not appear in your screenshots. This uses a comprehensive ruleset that covers the vast majority of consent management platforms.
These built-in features handle approximately 80% of cases without any configuration. If your screenshots are working on a site, these protections are doing their job silently in the background. The settings described below are for the remaining 20% of cases where sites have stricter security measures in place.
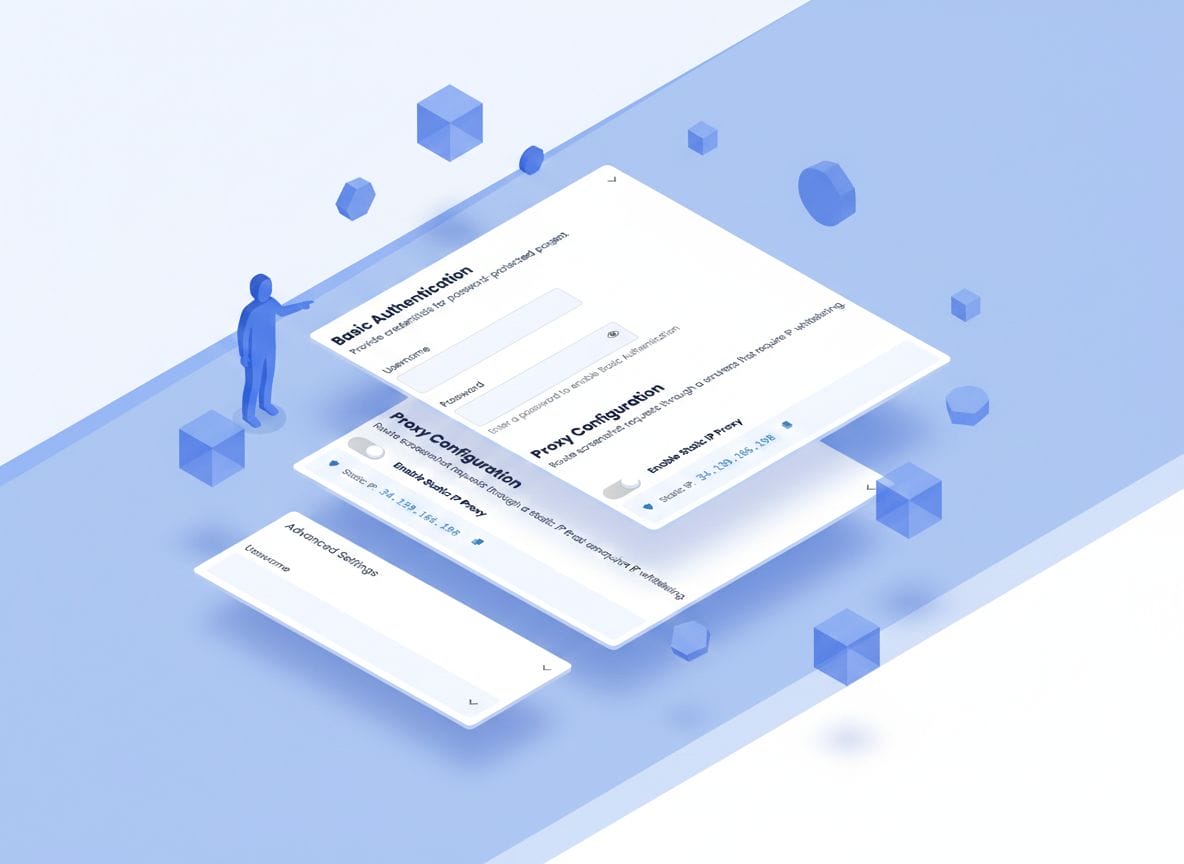
Static IP Proxy: The Primary Solution for Firewall Issues
The Static IP Proxy is the most effective setting for resolving firewall and WAF blocks. It is the same approach used by major testing platforms like BrowserStack, LambdaTest, and Diffy.
What the Static IP Proxy Does
Normally, WCD screenshots are taken by Google Cloud Functions, which use dynamic IP addresses from Google’s cloud IP ranges. Each screenshot request may come from a different IP address. This creates two problems:
- You cannot whitelist the IPs because they change constantly.
- Cloud IPs have poor reputation because they are shared with thousands of other services.
The Static IP Proxy routes all screenshot traffic through a single, fixed IP address:
Static IP: 34.139.186.198With this enabled, every screenshot request from WCD arrives at the target website from this one IP address. You can tell your client’s firewall: “Always allow requests from 34.139.186.198.” One whitelist entry, and all future screenshots pass through without challenge.
When to Use the Static IP Proxy
Enable the Static IP Proxy when any of these apply:
- The site uses a DNS-level WAF (Cloudflare, Sucuri, Astra)
- The site has a WordPress security plugin that blocks automated traffic
- The hosting provider has aggressive bot protection (WP Engine, Kinsta, Flywheel, Siteground)
- Screenshots show Cloudflare challenge pages, 403 errors, or security plugin block pages
- You manage the site’s firewall and can add IP whitelist rules
If screenshots are working without the proxy, leave it disabled. Direct connections are faster because they skip the proxy hop.
How to Enable the Static IP Proxy in WCD
- Open your monitoring group in the WebChangeDetector dashboard
- Click on Group Settings
- Expand the Advanced Settings section
- Under Proxy Configuration, toggle Enable Static IP Proxy
- Note the displayed IP address:
34.139.186.198(use the copy button) - Save the group settings
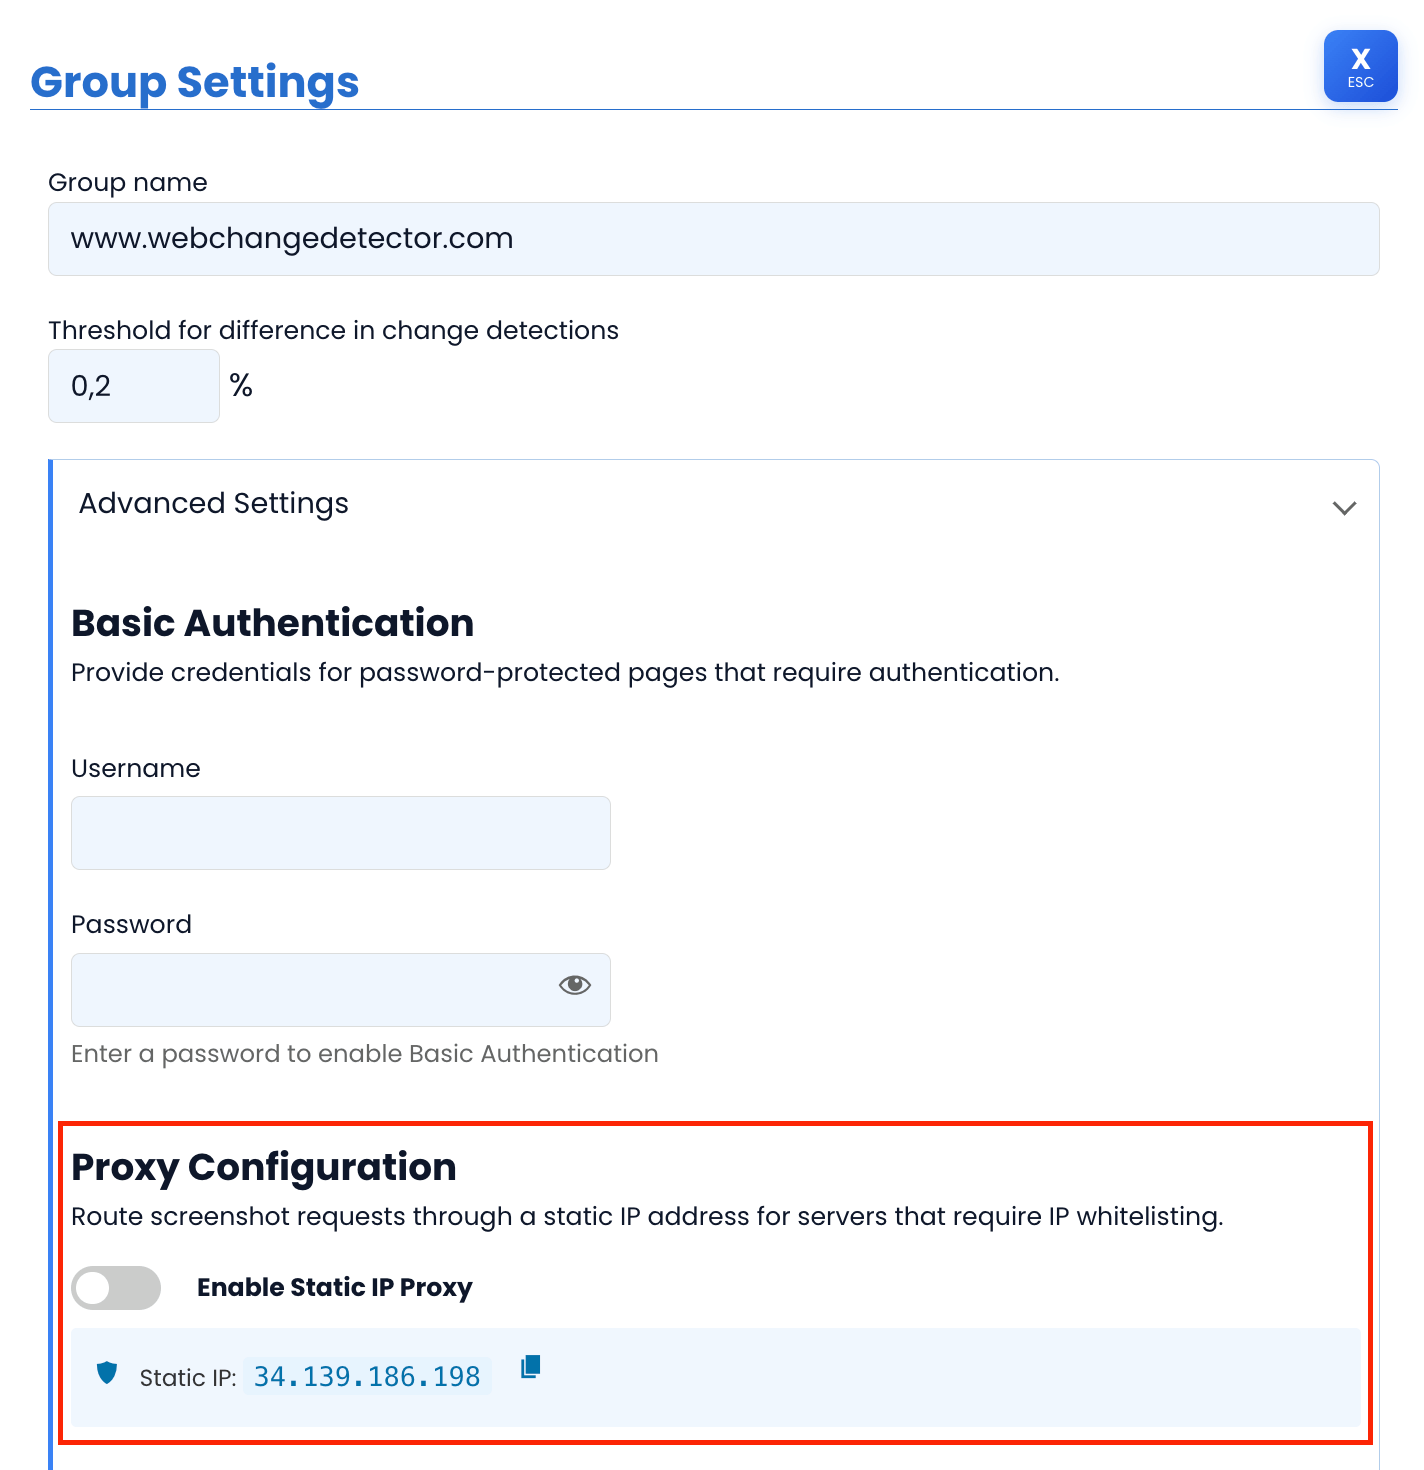
Important: This is a per-group setting. You can enable it for specific groups that need it while leaving other groups on direct connections. This lets you use the proxy only where necessary, keeping monitoring fast for sites that do not need it.
Whitelisting the Static IP: Step-by-Step Guides
After enabling the proxy in WCD, you need to add the IP to the site’s firewall allowlist. Below are instructions for the most common security solutions.
Cloudflare
Cloudflare is the most common DNS-level WAF. Whitelisting an IP ensures it bypasses all security challenges.
- Log in to the Cloudflare Dashboard
- Select the website
- Navigate to Security > WAF > Tools
- Under IP Access Rules, click Add
- Enter:
34.139.186.198 - Action: Allow
- Zone: Apply to this website (or “All websites in account” if you manage multiple client sites through one Cloudflare account)
- Add a note: “WebChangeDetector Screenshot Service”
- Click Add
Additional Cloudflare considerations:
- Bot Fight Mode: Even with IP whitelisting, Cloudflare’s Bot Fight Mode can still challenge or block requests. If screenshots fail after IP whitelisting, go to Security > Bots and check whether Bot Fight Mode is enabled. You may need to create a custom WAF rule that skips bot challenges for the WCD IP.
- Under Attack Mode: If the site is in “Under Attack Mode,” IP whitelisting is essential. The JavaScript challenge page cannot be solved by any screenshot tool.
- Super Bot Fight Mode (Pro/Business plans): This more aggressive detection may require a custom WAF rule: Security > WAF > Custom Rules > Create Rule with condition “IP Source Address equals 34.139.186.198” and action “Skip” for all security features.
Sucuri
Sucuri operates as a DNS-level firewall, similar to Cloudflare but with a different dashboard.
- Log in to the Sucuri Dashboard
- Select the website
- Navigate to Access Control > Whitelist
- Enter IP:
34.139.186.198 - Click Add
Note: Sucuri’s “Aggressive Bot Filter” blocks empty user agents and suspicious patterns. The WCD IP whitelist overrides these checks. If the site also runs a WordPress security plugin (like Wordfence), remember to whitelist the IP there as well, since Sucuri and Wordfence operate at different layers.
Wordfence
Wordfence runs inside WordPress at the application level. It can block requests that have already passed through DNS-level and server-level firewalls.
- Log in to the WordPress admin panel
- Navigate to Wordfence > Firewall
- Click All Firewall Options
- Scroll to Whitelisted IP Addresses
- Enter:
34.139.186.198 - Click Save Changes
Important: Wordfence also has rate limiting settings under Wordfence > Firewall > Rate Limiting. If the WCD IP is whitelisted but screenshots still fail intermittently, the rate limiter may be the culprit. Whitelisted IPs should bypass rate limiting, but verify this in your Wordfence configuration.
Other Security Solutions (Quick Reference)
| Security Solution | Where to Whitelist |
|---|---|
| iThemes Security (Solid Security) | Settings > Lockouts > Authorized Hosts > Add 34.139.186.198 |
| All In One WP Security | WP Security > Firewall > Brute Force > Whitelist IP |
| WP Engine | Contact WP Engine support to whitelist the IP at the platform level. Their firewall is not directly user-accessible. |
| Kinsta | Kinsta uses Cloudflare as their CDN. Whitelist the IP in Cloudflare (see above). Also check MyKinsta > Site > Tools to ensure the IP is not on the deny list. |
| Siteground | Site Tools > Security > Blocked IPs: ensure the IP is not blocked. Check SG Security plugin settings if installed. |
| Flywheel | Contact Flywheel support to add the IP to their allowlist. |
| ModSecurity (server-level) | Ask the hosting provider to add a ModSecurity exception for the IP, or add it to the server’s .htaccess whitelist. |
Verifying the Whitelist Works
After configuring the whitelist at all applicable layers:
- Go back to your WCD monitoring group
- Trigger a new screenshot (use the manual screenshot option for a single page)
- Check the result: you should now see the actual page content instead of a block page or blank image
- If it still fails, revisit the three-layer model: did you whitelist at all layers? A site using Cloudflare and Wordfence needs the IP whitelisted in both.
Screenshot Delay: Solving Rate Limit Problems
Even with the Static IP Proxy and proper whitelisting, you may encounter intermittent failures. Some screenshots in a batch succeed while others fail. This pattern almost always points to rate limiting.
What the Screenshot Delay Does
When WCD monitors a group of pages, it does not fire all screenshot requests simultaneously. Each job is staggered by a configurable delay. The mechanism works incrementally:
- Job 1: starts immediately
- Job 2: starts after 7 seconds
- Job 3: starts after 14 seconds
- Job 4: starts after 21 seconds
- …and so on
The default delay is 7 seconds between jobs. You can configure it anywhere from 7 to 60 seconds.
Example: A monitoring group with 30 pages at the default 7-second delay means the last page starts its screenshot approximately 203 seconds (about 3.4 minutes) after the first one.
Why Rate Limiting Becomes More Relevant With the Static IP Proxy
Here is an important detail: when you enable the Static IP Proxy, all requests come from the same IP address. Without the proxy, requests come from various Google Cloud IPs, so rate limits are distributed across multiple addresses. With the proxy, they are concentrated on one IP.
This means a server that allows 20 requests per minute from any single IP will start blocking after the 20th screenshot in a batch, even if the IP is whitelisted for WAF purposes. Rate limiting and WAF whitelisting are often separate configurations.
When to Increase the Screenshot Delay
Increase the delay when you observe:
- Intermittent failures: Some screenshots work, some fail within the same monitoring run
- 429 (Too Many Requests) responses captured in screenshots
- Shared hosting environments with strict resource limits
- Hosting providers that throttle sustained traffic from a single IP
- Large monitoring groups (50+ pages on a single site)
How to Configure the Screenshot Delay
- Open your monitoring group in the WebChangeDetector dashboard
- Click on Group Settings
- Expand the Advanced Settings section
- Under Screenshot Timing, adjust the delay slider (7 to 60 seconds)
- Save the group settings
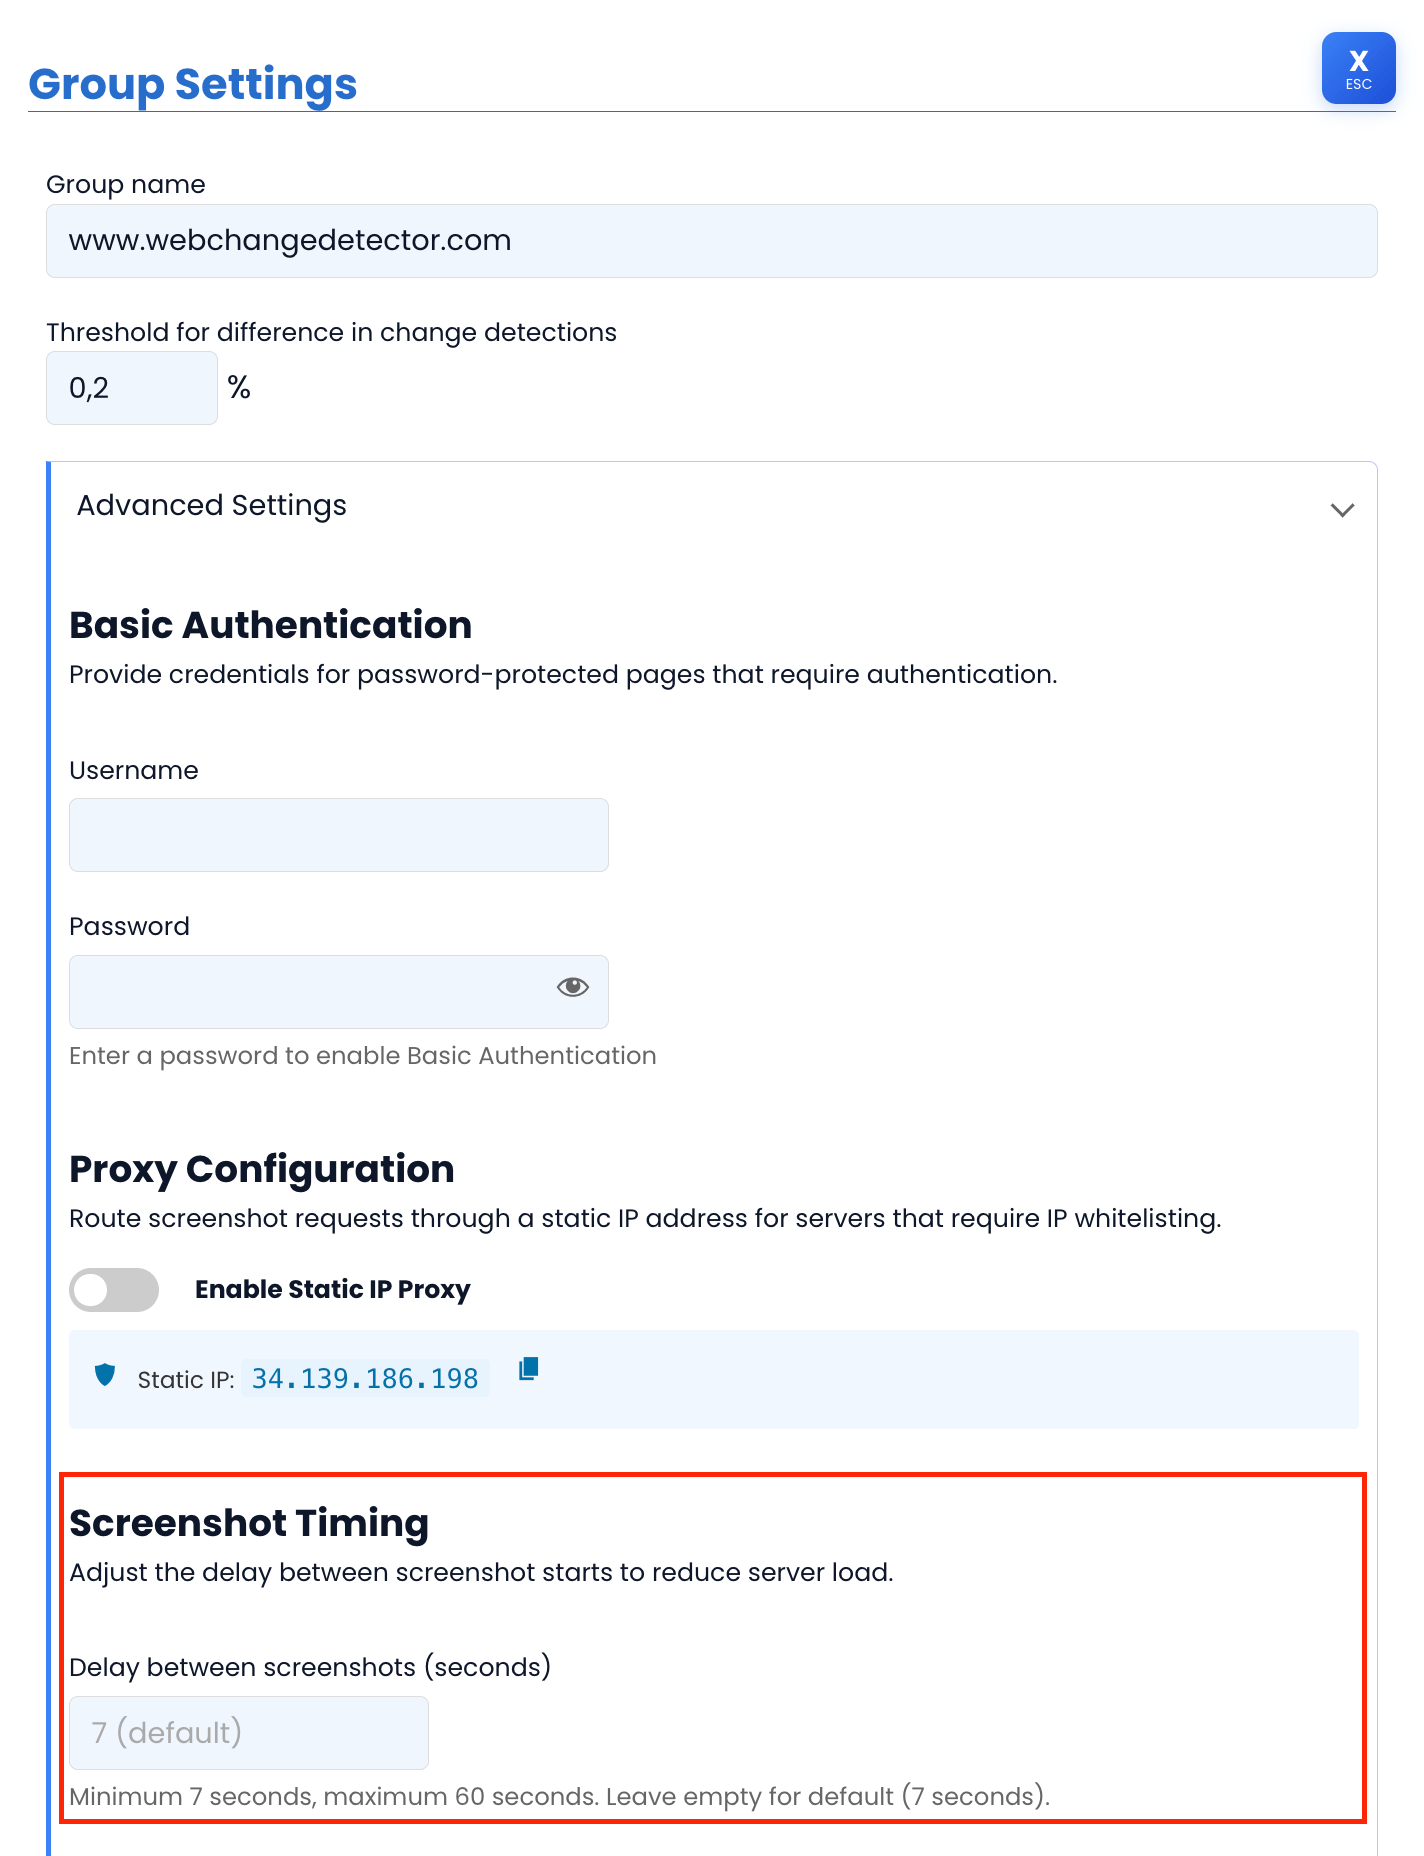
Finding the Right Delay Value
Start conservative and increase only if needed:
| Delay | Best For | Trade-off |
|---|---|---|
| 7 seconds (default) | Most sites, standard hosting | Fastest monitoring completion |
| 15 seconds | Sites with moderate rate limiting, shared hosting | Group of 30 pages completes in ~7.5 minutes |
| 30 seconds | Strict rate limiting, aggressive WAF rules, shared hosting with low resource limits | Group of 30 pages completes in ~15 minutes |
| 60 seconds (maximum) | Very strict environments, servers that throttle aggressively | Group of 30 pages completes in ~30 minutes |
The recommended approach: Start with the default (7 seconds). If you see intermittent failures, bump to 15 seconds and run another test. Only increase further if failures persist. The goal is to find the lowest delay that produces consistent results.
Troubleshooting Decision Tree
When screenshots fail, use this systematic approach to identify and resolve the issue.
Step 1: Identify the Symptom
Look at the failed screenshot output. What do you see?
Blank or white screenshot
The server blocked the connection entirely. No content was returned.
- Action: Enable Static IP Proxy, then whitelist the IP in the server’s firewall (check all three layers).
Cloudflare challenge page (“Checking your browser…” or “Just a moment…”)
Cloudflare’s bot detection or Under Attack Mode is active.
- Action: Enable Static IP Proxy, then whitelist the IP in Cloudflare’s WAF (Security > WAF > Tools > IP Access Rules > Allow).
- If still blocked: Check Cloudflare’s Bot Fight Mode (Security > Bots). Consider creating a custom WAF rule to skip challenges for the WCD IP.
403 Forbidden error page
A WAF or server firewall is blocking the request based on IP or request pattern.
- Action: Enable Static IP Proxy, then whitelist the IP at all security layers.
Wordfence or Sucuri block page
The WordPress security plugin is blocking the request.
- Action: Enable Static IP Proxy, then whitelist the IP in the security plugin settings. Also check whether there is a DNS-level WAF (Cloudflare/Sucuri) that needs separate whitelisting.
Some screenshots work, others fail (same site, same batch)
Rate limiting is the most likely cause. The first requests pass, then the rate limit triggers and blocks subsequent ones.
- Action: Increase the Screenshot Delay to 15 or 30 seconds. If using the Static IP Proxy, this is especially important since all requests share one IP.
Page loads but content is incomplete or broken
Asset rate limiting: the HTML page loaded, but CSS, JavaScript, or image requests were throttled separately.
- Action: Enable Static IP Proxy and whitelist the IP. Then increase the Screenshot Delay.
Step 2: Verify Multi-Layer Whitelisting
If the Static IP Proxy is enabled but screenshots still fail, work through this checklist:
- DNS-level WAF (Cloudflare, Sucuri): Is
34.139.186.198whitelisted? - Hosting-level firewall (ModSecurity, hosting provider rules): Is the IP allowed?
- WordPress security plugin (Wordfence, iThemes, etc.): Is the IP whitelisted?
All three layers must allow the IP. Missing even one will result in blocked screenshots.
Step 3: Escalation Path
If all settings are configured and screenshots still fail:
- Check Cloudflare Bot Fight Mode: This can override IP whitelists. Disable it temporarily to test, or create a custom WAF rule.
- Check hosting platform-level blocks: Some managed WordPress hosts (WP Engine, Flywheel) have platform-level security that is not user-configurable. Contact their support.
- Increase the Screenshot Delay to the maximum (60 seconds) to rule out rate limiting.
- Check for Basic Authentication: If the site is password-protected (staging environments often are), configure the Basic Auth credentials in your WCD group settings.
- Contact WCD support with the monitoring group details for further diagnosis.
Quick Reference Table
Bookmark this table for fast troubleshooting across your client sites.
| Problem | Symptom | WCD Setting | How to Configure |
|---|---|---|---|
| WAF/Firewall blocking | Blank screenshots or 403 errors | Static IP Proxy | Group Settings > Advanced > Enable Static IP Proxy, then whitelist 34.139.186.198 in firewall |
| Cloudflare Under Attack Mode | Cloudflare challenge page in screenshot | Static IP Proxy + Cloudflare whitelist | Enable proxy, then Cloudflare > Security > WAF > IP Access Rules > Allow the IP |
| Wordfence blocking | Wordfence block page in screenshot | Static IP Proxy + Wordfence whitelist | Enable proxy, then Wordfence > Firewall > All Options > Whitelisted IP Addresses |
| Sucuri blocking | Sucuri “Access Denied” page | Static IP Proxy + Sucuri whitelist | Enable proxy, then Sucuri Dashboard > Access Control > Whitelist the IP |
| Rate limiting | Some screenshots work, some fail | Increase Screenshot Delay | Group Settings > Advanced > Screenshot Timing > Set to 15-30 seconds |
| Rate limiting + WAF | Mix of blocked and rate-limited failures | Static IP Proxy + increased delay | Enable proxy, whitelist IP, set delay to 20-30 seconds |
| Password-protected staging site | Login page captured instead of content | Basic Authentication | Group Settings > Advanced > Basic Auth > Enter username and password |
| Managed hosting block | Blank or error despite all whitelists | Contact hosting support | Ask hosting provider to whitelist 34.139.186.198 at platform level |
Best Practices for Agencies Managing Multiple Client Sites
Managing visual regression testing across a large portfolio of client sites requires a systematic approach. Here are the practices that work best at scale.
Create a Client Onboarding Checklist
When adding a new client site to WCD monitoring, follow this sequence:
- Take a test screenshot first without any proxy settings. If it works, no further configuration is needed. Move on.
- If the screenshot fails, identify what security the site uses. Check for Cloudflare (look at DNS records or the page headers), ask the client about their security plugins, and check the hosting provider.
- Enable the Static IP Proxy for the monitoring group.
- Whitelist the WCD IP at every applicable security layer (DNS WAF, server firewall, WP security plugin).
- Test again. Take a manual screenshot to verify.
- If intermittent failures occur, increase the Screenshot Delay to 15 seconds and test once more.
- Document the configuration: Note which security layers the site has and where you whitelisted the IP.
Organize Groups by Security Requirements
Not all client sites need the same settings. Organizing your monitoring groups thoughtfully saves time and keeps monitoring fast:
- Sites without firewall issues: Use default settings (no proxy, 7-second delay). These groups complete monitoring fastest.
- Sites behind WAFs: Enable Static IP Proxy. Use default or slightly increased delay.
- Sites with strict rate limiting: Enable Static IP Proxy with 15-30 second delay.
This approach avoids the overhead of routing every site through the proxy when most sites do not need it.
Document Client Firewall Access
Keep a record for each client site:
- Which security layers are in place (Cloudflare, Sucuri, Wordfence, hosting firewall, etc.)
- Where you whitelisted the WCD IP (and who has access to change it)
- Login credentials or access instructions for each security dashboard
- The hosting provider’s support contact for platform-level firewall changes
This documentation becomes invaluable when a client changes their security configuration, switches hosting, or adds a new security plugin, and screenshots suddenly start failing again.
Monitor for Changes
Previously working screenshots can start failing when:
- A client installs a new security plugin
- The hosting provider updates their firewall rules
- Cloudflare settings change (e.g., enabling Bot Fight Mode or Under Attack Mode)
- The site migrates to a new host with different security
When WCD alerts you to screenshot failures on a site that was previously working, re-check the security stack. The most common cause is a change on the security side, not on the WCD side.
Conclusion
Firewalls and security tools blocking your screenshots is frustrating, but it is actually a good sign. It means your clients’ sites are protected against automated threats. The goal is not to bypass security; it is to create a controlled exception for your monitoring tool.
Here is the simple approach that works for the vast majority of cases:
- Start with default settings. WCD’s built-in stealth features handle most sites automatically.
- If blocked, enable the Static IP Proxy and whitelist
34.139.186.198at every security layer. - If rate-limited, increase the Screenshot Delay to spread requests over time.
One IP address, one whitelist entry per security layer, and an appropriate delay. That is all it takes to maintain reliable visual regression testing across your entire client portfolio.