A plugin update ships overnight. Your checkout page breaks. You find out three days later from a customer complaint.
This is exactly the scenario Auto Update Checks is built to prevent. It takes screenshots of your site before and after every WordPress auto-update, compares them pixel-by-pixel, and emails you if anything looks different, all without you doing a thing.
This tutorial covers every setting and walks through the full workflow so you can get it running in under 10 minutes.
How it works
Auto Update Checks hooks directly into WordPress’s built-in auto-update process. Here is the exact sequence:
- WordPress detects an available auto-update (plugin, theme, or core)
- WebChange Detector intercepts and takes before screenshots of your monitored pages
- WordPress runs the update
- WebChange Detector takes after screenshots of the same pages
- The two sets are compared pixel-by-pixel
- You get an email with the results
You configure it once. After that, it just runs.
Which updates trigger it?
- WordPress core (requires
WP_AUTO_UPDATE_COREto be enabled) - Plugins — only the ones you have enabled for auto-updates in WordPress
- Themes — same, only the ones set to auto-update
Heads up: This only works for auto-updates. If you manually click “Update” in the WordPress dashboard, that update won’t be intercepted. For manual updates, use the on-demand check workflow instead.
Before you start
Make sure you have these in place:
- WebChange Detector plugin installed and connected — your API token must be saved in the plugin settings
- At least one auto-update enabled in WordPress — check under Dashboard > Updates or look for “Auto-updates enabled” in your Plugins list
- At least one URL selected in your WebChange Detector URL list
- Screenshot quota available on your WCD account
Where to find the settings
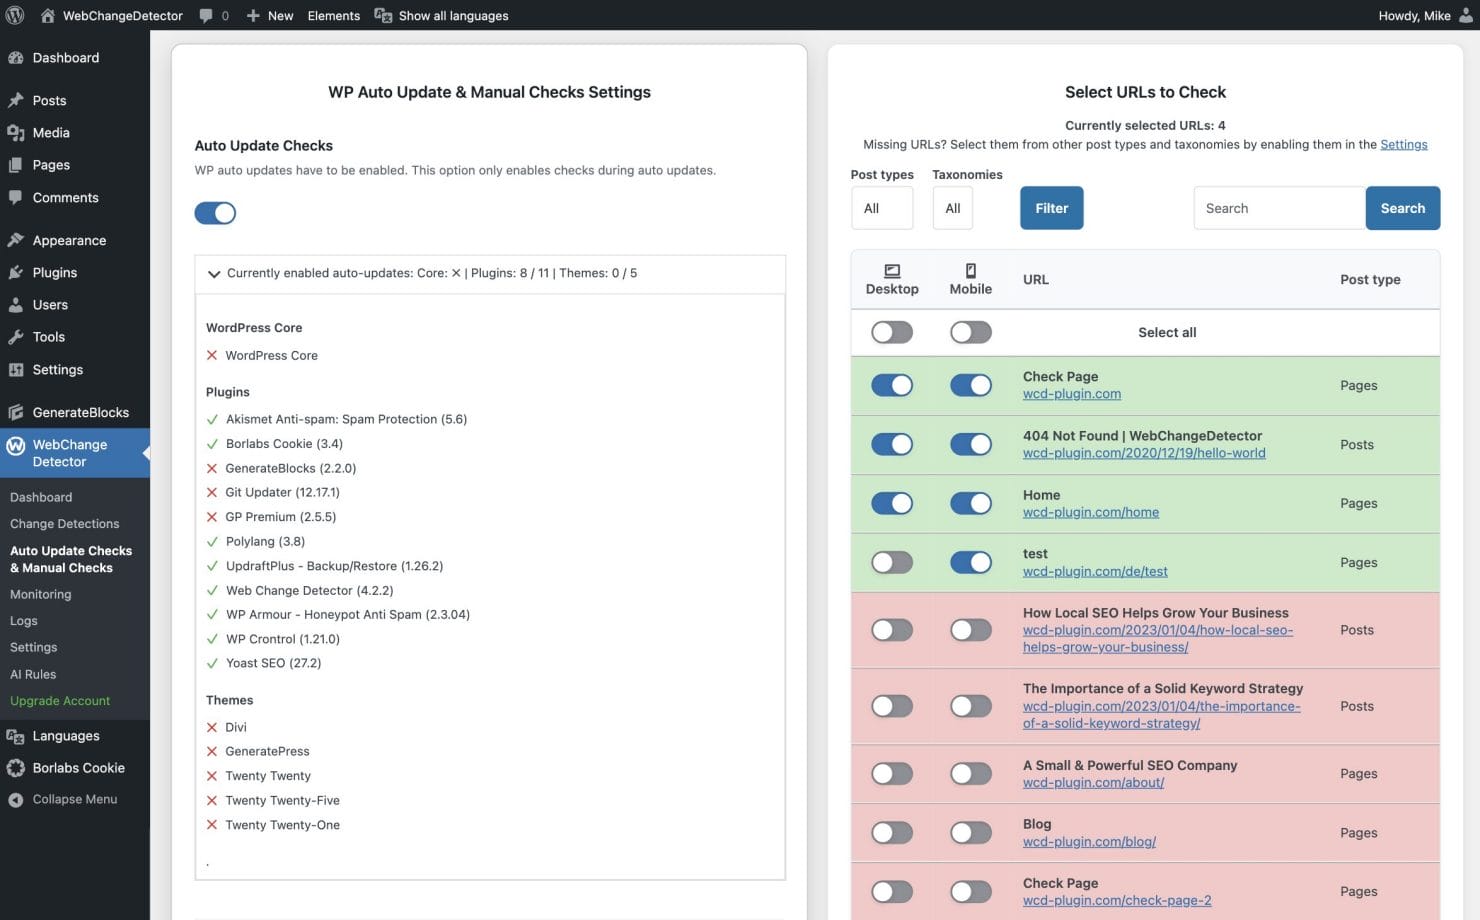
In your WordPress admin: WebChange Detector → Settings → On-Demand Checks Settings

Every setting explained
Enable / Disable
The main toggle. Flip it on and WebChange Detector starts watching for auto-updates. Flip it off and WordPress updates run as normal, with nothing intercepted.
This only does something if WordPress has auto-updates enabled. No auto-updates configured in WordPress = nothing to intercept.
Time window
Set a window during which auto-updates are allowed to run. Updates outside this window get held back until the window opens again.
- From: Start of allowed window (e.g., 02:00)
- To: End of allowed window (e.g., 06:00)
Midnight wraparound works too — From: 22:00 / To: 06:00 covers 10 PM to 6 AM.
Times are stored in UTC. The plugin converts them to your site’s timezone for display — just make sure your timezone is set correctly under Settings → General.
Weekday selection
Choose which days of the week updates are allowed to run. One checkbox per day, Monday through Sunday. You must pick at least one.
If you only want updates during your weekend maintenance window, enable Saturday and Sunday and leave the rest unchecked.
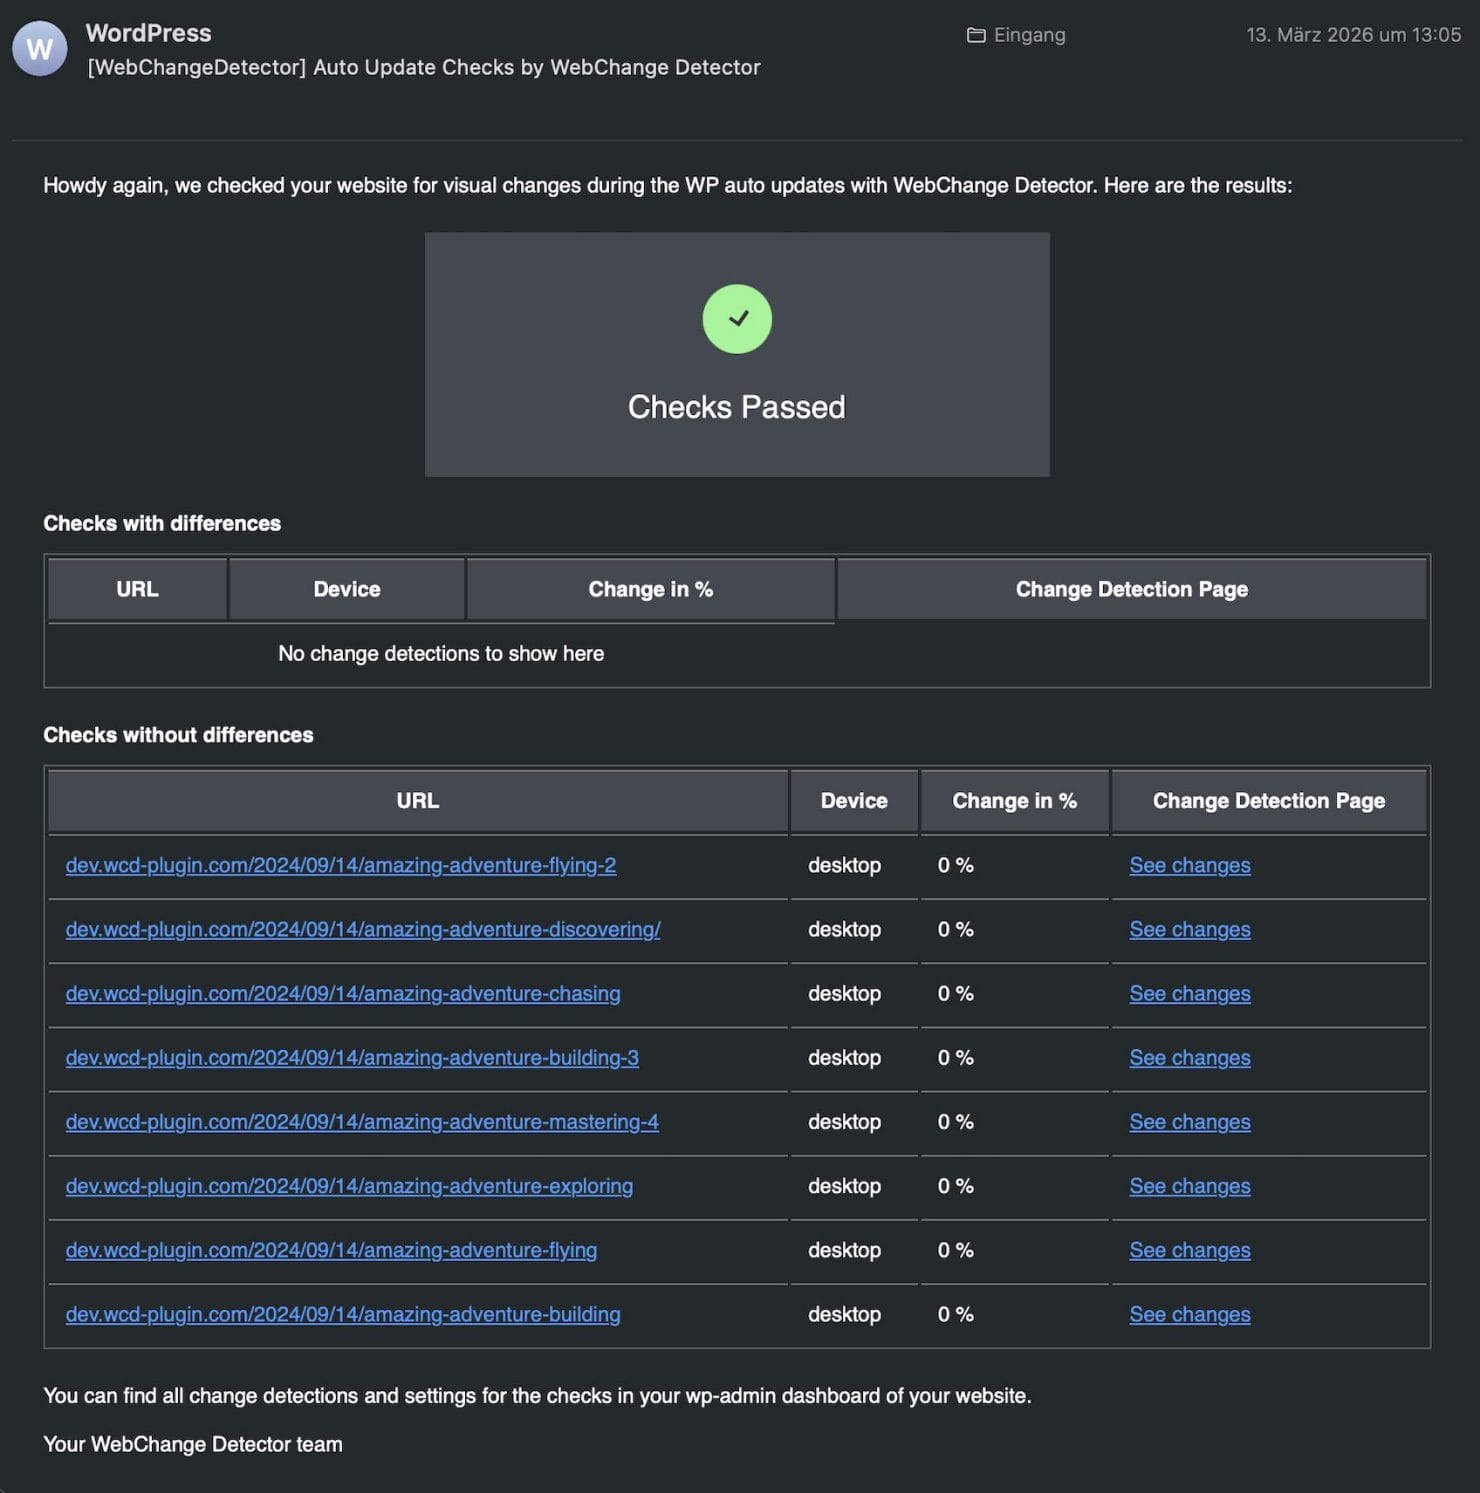
Notification emails
Enter the email addresses (comma-separated) that should receive the change detection report after every update cycle. Leave this empty and the system runs silently.
What’s in the email:
- A clear verdict: green “Checks Passed” or red “We found changes”
- A table of every monitored URL with its change percentage
- Separate sections for URLs with and without differences
- Direct links to the full before/after comparison for each URL
Subject line: [Your Site Name] Auto Update Checks by WebChange Detector
Important: These emails are sent through your WordPress site’s own mail system. If your host doesn’t have mail configured properly, notifications may never arrive — or land straight in spam. To make sure they get through, install an SMTP plugin like WP Mail SMTP and connect it to a transactional email provider (Mailgun, SendGrid, Postmark, etc.).
Change detection threshold
This filters out noise. At 0%, any pixel difference triggers a result. At 5%, only changes affecting more than 5% of the page get flagged.
Start at 0% and bump it up only if you’re getting too many alerts from things you don’t care about — rotating banners, live chat widgets, animated counters, that kind of thing.
Use this setting carefully. Even small percentages can hide significant changes. If you’re on a paid plan, we recommend leaving this at 0% — our AI analysis will automatically classify what changed and filter out the noise for you. Only increase the threshold if you’re on the free plan and getting too many alerts from dynamic content like rotating banners, live chat widgets, or animated counters.
Advanced settings
Click the accordion to reveal these options:
Basic Auth (Username / Password)
Staging site behind a password? Enter your HTTP Basic Auth credentials here and the screenshoter will authenticate automatically when loading each page.
Static IP Proxy
Route screenshots through a specific network path. Useful if your site’s firewall only allows specific IPs: select the static IP proxy option and whitelist it in your firewall settings.
Screenshot Delay ( in seconds)
Wait X seconds before the next screenshot in the queue starts. This prevents server overload when capturing multiple pages. Minimum is 7 seconds. Increase this if you notice your server struggling during screenshot batches.
CSS Injection
Inject CSS before the screenshot is taken to hide elements that always look different, e.g. countdown timers. Example:
.live-countdown { visibility: hidden !important; }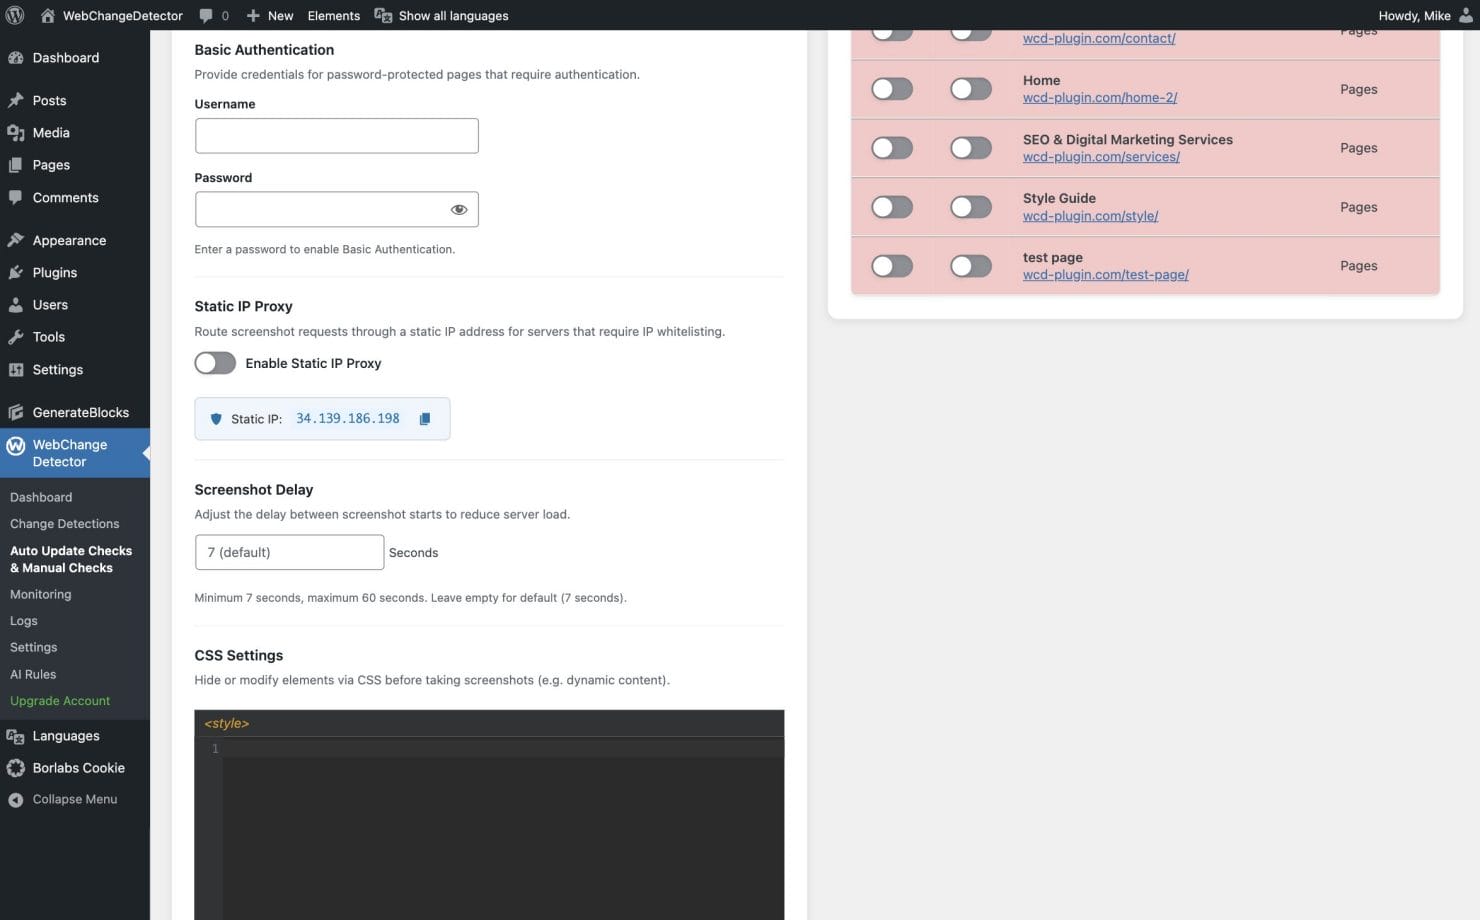
Currently enabled auto-updates
Below the main form, there’s an informational accordion that shows you exactly what WordPress is currently set to auto-update: core status, which plugins have auto-updates on, and which themes. Open it to verify your WordPress and WebChange Detector settings are in sync.
What actually happens during an update cycle
Step 1: WordPress detects available updates
WebChange Detector is sitting in the background, watching. The moment WordPress is about to trigger an auto-update, it steps in.
Step 2: Before screenshots
Before a single file gets updated:
- All known caching plugins are cleared automatically (WP Rocket, W3 Total Cache, LiteSpeed Cache, and more)
- Screenshots are taken of all your active monitored URLs
- A lock pauses the WordPress update process while screenshots are in progress
- Once all screenshots are done, the lock is released and WordPress proceeds
Step 3: WordPress runs the update
WordPress does its thing. Plugins update, themes update, core updates, whatever was queued.
Step 4: After screenshots and comparison
Once the update is done:
- Caches are cleared again
- After screenshots are taken of the same URLs
- Each after-screenshot is compared against its before-screenshot
- Results are saved and the notification email goes out
Reviewing the results
Go to WebChange Detector → Change Detection and look for the batch labeled “Auto Update Checks”. Each row shows the URL, device type, and difference percentage. Click any row to open the full comparison with before/after slider, diff overlay, and AI analysis.
For a complete walkthrough of the comparison popup, AI classification categories, feedback rules, and review best practices, see: How to Review Change Detections.
Which pages get monitored?
Auto Update Checks uses your On-Demand Detection Group URLs. The same ones you’d use for a on-demand before/after check. Manage them under WebChange Detector → On-Demand Checks: enable or disable individual pages, set device types (desktop/mobile) per URL.
You don’t need to add every page on your site. Focus on the ones where a broken layout actually hurts: homepage, checkout, contact form, pricing page, key landing pages.
Reliability features (the stuff running in the background)
A few things worth knowing about how the system keeps itself from getting stuck:
12-hour cooldown: After an update cycle completes (or fails), the system waits at least 12 hours before running again. No infinite retry loops.
Fallback cron: If WordPress’s automatic_updates_complete hook doesn’t fire — which happens on some hosting setups — a 2-minute fallback cron takes the after screenshots anyway.
External webhook: WebChange Detector creates a webhook that pings your site to force WordPress cron processing. This matters on low-traffic sites where WordPress cron jobs barely run on their own.
AI change classification (all paid plans)
If you’re on a paid plan, every comparison is automatically analyzed by AI. It classifies each change region as Alert (real content change), All Good (expected dynamic content), or Not Sure (needs your review). The AI verdict shows in the comparison popup and in the alert email, so you can triage at a glance. You can also create feedback rules to teach the system about expected changes on your specific site. See the full details in our review guide.
Set it up once, stop worrying about updates
Auto Update Checks runs completely on its own after the initial setup. You only hear from it when something actually changed, no manual checking, no post-update anxiety.
- Install the WebChange Detector plugin and connect your API token
- Enable the pages you want to monitor under WebChange Detector → URLs
- Set your update window and add your notification email
- Flip the Auto Update Checks toggle on
The next time WordPress auto-updates, you’ll know exactly what changed — before any of your users do.
Troubleshooting
Toggle won’t save or is greyed out
Your API token is probably missing or invalid. Go to the main plugin settings and check that the token is entered correctly. If this doesn’t help, go to settings, remove the API token an re-add it.
Updates are running but no screenshots appear
Check that your time window and weekday settings cover the time the updates ran and the Auto Update Checks are enabled.
Too many alerts from things you don’t care about
When our AI feature (trial and paid plans) marks changes as alerts, which aren’t actual alerts, you can ignore them in future. In the next checks, they will be marked as ok and auto-ignored by rule.
Additionally you can: Either bump up the threshold a few percent, or use CSS injection to hide the elements causing the noise (rotating images, live counters, chat widgets).
Notification emails aren’t arriving
Check spam first. If they’re not there either, your WordPress site probably isn’t sending mail reliably. Install WP Mail SMTP and connect a transactional email provider. This fixes the issue in almost every case.
Pre-update screenshots take a long time
The only way to speed up pre-update screenshots: Reduce the number of monitored URLs. We have a delay of at least 7 seconds to prevent overloading the website’s server.